Contec file import
|
Afrikaans /
في الصفحة /
български /
中国 /
臺灣 /
čeština/
Dansk /
Deutsch /
Ελληνικά /
Español /
Filipino /
Français /
עברית /
Magyar /
Italiano /
日本語 /
한국어 /
Nederlands /
Norsk /
Polskie /
Português /
Română /
Pусский /
Suomalainen /
Svenska /
ภาษาไทย /
Türkçe |
Contents
Supported pulse oximeters
- Contec CMS-50D+, CMS-50-E, CMS-50E, CMS-50EA
- Contec CMS-50F, CMS-50H, CMS-50I (v3.7 firmware or later)
- Pulox PO-200/300/400/500
The instructions on this wiki page are for the CMS50F model and should work for the other models.
CMS50F models
Both the old and new models look the same. The newer models have updated hardware and software internally. Determining which model you have:
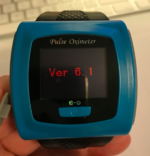
The older CMS50F model will briefly show Ver 6.1 when it is first turned on. These models are capable of being directly imported into OSCAR using the cable supplied with the oximeter, or by using the Smart Device Assistant v3.1.0.1 software (Windows only) and importing the SpO2 file.
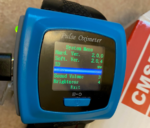
The newer CMS50F will briefly show Hard. Ver. 2.0.0 and Soft. Ver. 2.0.4 when first turned on. The hardware and software versions are also listed in the "System Menu".
OSCAR is not currently compatible with directly importing the data from these newer models. The "Smart Device Assistant" software (Windows only) must be used. The software will extract the data from the oximeter and save it as an SpO2 file which can be imported into OSCAR.
Importing your oximetry data
Older model direct import into OSCAR
Remove the fingertip sensor. Using the cable that was supplied with your oximeter, attach the oximeter to your computer. Turn the oximeter on. Open OSCAR and import your CPAP data. From the Welcome screen select "Oximetry Wizard" (alternatively from the menubar select Data > Oximetry Wizard or the F7 key (fn+F7 for Mac)), select the correct oximeter from the dropdown list, and click "Import directly from a recording device". Another screen will appear saying it is connecting to your device and your device is uploading data. Once the upload is complete the window will ask you when the recording started and show a calendar. It is suggested that you check the box labeled "I started this oximeter recording at (or near) the same time as a session on my CPAP device". The CPAP session you are importing into should show along with a horizontal bar showing the length of the session. Click the "Save and Finish" button. Your oximetry data should now show in the OSCAR graphs.
Software import SpO2 files, both models
Note: Windows "File Explorer" will need to be able to view "Hidden Items" in order to view the location where the SpO2 files are stored.  For Windows 10, with File Explorer open select the "View" tab and tick the box for "Hidden Items" and also "File name extensions".  Close File Explorer, then re-open it and you should be able to see the hidden folder(s) where the files are located.
(Other versions of Windows may call the setting "Hidden Files" instead of Hidden Items.)
Note: The Smart Device Assistant software must be used (Windows only)
Remove the fingertip sensor. Using the cable supplied with your oximeter, attach the oximeter to your computer. Turn the oximeter on. Open the Smart Device Assistant software.
From the main window click the connector icon (looks like a DB9 connector on the back of a desktop computer). A window will open saying "Devices found" and will list your oximeter under a USB connection (You can untick the Bluetooth box). At the bottom of that window tick the box "View device stored data only", then click the "Connect" button.
A window will open with the stored data on the device. Tick the box under "User index". At this point you can click "User information" and enter your personal info, or skip that and click "Receive data". After the import is complete it will return to the main window. The SpO2 file that was imported will be located at:
C:\Users\YourUserName\AppData\Local\VirtualStore\Program Files (x86)\Smart Device Assistant V3.1.0.1\Data
The following steps are not necessary but will let you view the data before importing into OSCAR.
Click the Folder icon. In the address bar you can navigate to the location (listed above) and select the SpO2 file you just imported from the oximeter. You can view the graphs and reports available in the software. Exit the Smart Device Assistant app when you are done.
Importing SpO2 files into OSCAR
Open OSCAR. From the Welcome screen click the Oximetry Wizard icon (alternatively from the menubar select Data > Oximetry Wizard or the F7 key (fn+F7 for Mac)). From the Oximeter Import Wizard screen click the floppy disk icon (Import from a datafile saved by another program). A File Explorer like screen will open where you can navigate to the SpO2 data location (listed above). Select the SpO2 file that was created in the previous section. The next window will ask you when the recording started and show a calendar. It is suggested that you check the box labeled "I started this oximeter recording at (or near) the same time as a session on my CPAP device". The CPAP session you are importing into should show along with a horizontal bar showing the length of the session. Click the "Save and Finish" button. Your oximetry data should now show in the OSCAR graphs.
Smart Device Assistant software
The software can be downloaded at https://www.dlsoftw.com with index code: 01GS4016.

Donate to Apnea Board

