Difference between revisions of "Lowenstein PrismaLine optimization"
(→Bi-level S/T) |
m (→Flow Limitations) |
||
| (150 intermediate revisions by 2 users not shown) | |||
| Line 1: | Line 1: | ||
{{OSCAR}} | {{OSCAR}} | ||
| − | + | ||
==Oscar Optimisation for Lowenstein== | ==Oscar Optimisation for Lowenstein== | ||
===Prisma Smart & Prisma 20A Devices=== | ===Prisma Smart & Prisma 20A Devices=== | ||
| Line 14: | Line 14: | ||
| | | | ||
'''Event Types''' | '''Event Types''' | ||
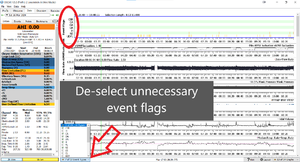
| − | * Let's start by cleaning up the excessive '''event types'''. Goto the indicated drop-down at the bottom of the page and select only those event types circled near the top in red. | + | * Let's start by cleaning up the excessive '''event types'''. Goto the indicated drop-down at the bottom of the page and select only those event types circled near the top in red. These events are the main ones we are interested in. |
|- | |- | ||
| | | | ||
| Line 20: | Line 20: | ||
| | | | ||
'''Flow Limitation Flag Color''' | '''Flow Limitation Flag Color''' | ||
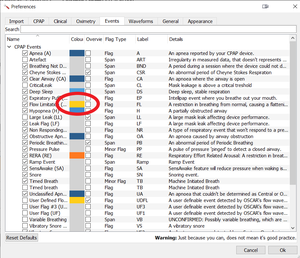
| − | * Flow limitation flags can | + | * Flow limitation flags can visually distracting when there are a lot of them, and when they are colored black. Change from black to something milder, like orange, or dark yellow. Goto file > preferences > events tab. Double click on the color swatch for flow limitations. |
| − | * The color scheme seen in these examples was used to tone | + | * The general color scheme seen in these few examples, was used to tone down some of the bright colors used by default. Any simplification of appearance can be an advantage when going over data with scowling industry professionals. Major event flags have been colored mid to dark blue, RERA orange and flow limitations dark yellow. Under the waveforms tab, most color swatches have been set to grey and dark grey. |
|- | |- | ||
| | | | ||
| Line 28: | Line 28: | ||
| | | | ||
'''Adjust y-axis scaling''' | '''Adjust y-axis scaling''' | ||
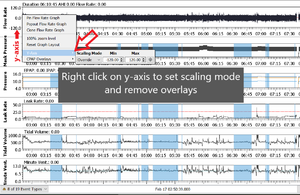
| − | * For a clean and consistent view of your breathing flow rates, right click the Y-Axis (left side) of the '''flow rate''' chart and set the Y-Axis to '''override'''. Set the axis to -120 min and 120 max. This will give a good all round view of nice regular breathing, along with clear indication of any 'arousal spikes'. While you are in the Flow Rate chart menu, remove all '''overlays'''. | + | * For a clean and consistent view of your breathing flow rates, right click the Y-Axis (left side) of the '''flow rate''' chart and set the Y-Axis to '''override'''. Set the axis to something like -120 min and 120 max. This will give a good all round view of nice regular breathing, along with clear indication of any 'arousal spikes'. While you are in the Flow Rate chart menu, remove all '''overlays'''. |
| − | * | + | * Click & drag the bottom border of the Flow Rate graph and resize to your preference. |
|} | |} | ||
| − | Advanced users may set Y-Axis over-ride on many of the other charts as well. This increases user friendliness and read-ability. Otherwise, outlier data can re-scale the chart, causing irregular display of the main data and confusing day to day comparisons. The increments of Y-Axis may also end up in strange divisions. On the included examples, most of the Y-Axis have been | + | '''Finally''', be sure to resize all graphs either through preferences, or by manually dragging them to fit more of the important ones in a single screen clip. |
| + | |||
| + | ===Advanced users=== | ||
| + | Advanced users may set Y-Axis over-ride on many of the other charts as well. This increases user friendliness and read-ability. Otherwise, outlier data can re-scale the chart, causing irregular display of the main data and confusing day to day comparisons. The increments of Y-Axis may also end up in strange divisions. On the included examples, most of the Y-Axis have been overridden to give a repeatable and consistent view of each metric. Y-axis overrides that increase usefulness are, '''leak rate''' 0-50 with dotted line at leak threshold and '''tidal volume''' 0-1000. '''Mask Pressure''' & '''Pressure''' can benefit from overide by setting to a tighter range around your own specific pressures. Try make all Y-Axis increments equal whole numbers. A dotted line at max mask pressure can be handy if using APAP. | ||
| + | |||
| + | Finally, but maybe most helpful for interpreting your data, is to create at least 2 '''profiles'''. The first one I call 'compact' and the other 'detailed'. In the compact profile, shrink the height of as many data rows as possible. Size the flowrate graph so the spike ups are not too prominent, but the biggest are still easily seen. This will give you a good general picture of a nights therapy. Most full charts pictured in this wiki are using this compact view. | ||
| + | |||
| + | However, this compact view will not be best for analyzing breath shapes and fine tuning therapy settings. This is especially true as soon as you start using bi-level or any variant of it, like softpap or epr etc. For this you will want a profile you can switch too quickly with a couple of critical changes to at least '''Flow Rate''' and '''Mask Pressure'''. In order to set these for best viewing, you should make sure the y-axis override is not too far off the actual flow rate and your pressure range. Make sure your oscar window is maximized or a least how you usually view it. Pick the best section of one of your best nights. Zoom in with left click until the flowrate duration is 1 minute. From here, drag the row height so that each inhalation is close to semi circle, without being too tall or too squat. Roughly match the mask pressure signal to the same height as each breath signal, so they are relative to each other. | ||
| + | [[File:Detailed view.png|thumb|center|1000px]]Note: Consistent viewing will be dependent on your window size and flowrate duration being the same as they are when you set this. | ||
| + | Without a set baseline and zoom like this, you will not get as good a sense of each day compared to one another. Breaths can appear far taller or flatter, all dependent on these variables. If you are wanting to see subtle change in breath dynamics with a change in pressure support for eg. then this is very helpful. | ||
| − | ===Prisma Bi-Level Devices=== | + | ===Extra Settings for Prisma Bi-Level Devices=== |
Apart from the above display settings, Lowenstein Bi-level devices can need some extra tweaking. | Apart from the above display settings, Lowenstein Bi-level devices can need some extra tweaking. | ||
| Line 47: | Line 56: | ||
| | | | ||
[[File:Custom flags.png|thumb|center|300px]] | [[File:Custom flags.png|thumb|center|300px]] | ||
| + | [[File:Custom flags2.png|thumb|center|300px]] | ||
| | | | ||
'''User Defined Flow Limitations''' | '''User Defined Flow Limitations''' | ||
* Many Prisma therapy modes don't show flow limitations in Oscar. When this is the case (Resmed users included) you can utilize the custom event flagging in Oscar preferences. Setting the second user definable event to a percentage of 70% and length 7sec gives quite an accurate representation of these events. | * Many Prisma therapy modes don't show flow limitations in Oscar. When this is the case (Resmed users included) you can utilize the custom event flagging in Oscar preferences. Setting the second user definable event to a percentage of 70% and length 7sec gives quite an accurate representation of these events. | ||
| − | |||
| − | |||
| − | |||
| − | |||
| − | |||
* Rename the event to something like '''User Defined Flow Limitation''' and the flag to '''UDFL'''. Select its overview option if you would like to see flow limitation over time in the statistics overview screen. | * Rename the event to something like '''User Defined Flow Limitation''' and the flag to '''UDFL'''. Select its overview option if you would like to see flow limitation over time in the statistics overview screen. | ||
* Finally, in your event types drop down, deselect the non working FL and select your new UDFL event. | * Finally, in your event types drop down, deselect the non working FL and select your new UDFL event. | ||
| Line 62: | Line 67: | ||
=PrismaLine CPAP & APAP modes= | =PrismaLine CPAP & APAP modes= | ||
| − | ===SoftPAP Compared | + | ===SoftPAP Compared EPR=== |
| − | There is quite a difference in the so called "comfort" settings of the various CPAP & APAP machines. | + | There is quite a difference in the so called "comfort" settings of the various CPAP & APAP machines. Lowenstein '''Prisma Smart''' & '''Prisma20A''' provide these settings as a limited form of regular '''Bi-level''' modes found on bi-level machines. These bi-level modes allow a more sophisticated pressure range for addressing more complicated respiration needs. |
Lowenstein SoftPap is here compared in application to the EPR of Resmed. | Lowenstein SoftPap is here compared in application to the EPR of Resmed. | ||
===Algorithm differences=== | ===Algorithm differences=== | ||
| − | + | '''Bi-level''' is the application of more than 1 pressure level during different breathing stages. The example below shows bi-level therapy in action. This is infact not on a "Bi-level" machine, but a Prisma20A with CPAP pressure of 12cmH2o and Softpap2 activated. The machine is now applying 2 different pressures. The lower pressure of '''EPAP''' (exhalation positive airway pressure) and the higher pressure of '''IPAP''' (inhalation positive airway pressure). The difference between these two pressures is termed pressure support, abreviated normally to '''PS'''. The example below shows a PS of 3cmH2o. This is the maximum PS available on a '''Prisma Smart''' and delivers the same support as Resmeds EPR 3, although as you will see, the differing air delivery of the two devices, affects how this pressure support shapes your breathing. | |
[[File:Softpap2_example.png|thumb|center|1000px]] | [[File:Softpap2_example.png|thumb|center|1000px]] | ||
| − | + | If we look closely at the bi-level algorithm in use by Lowenstein, we notice that following the release of IPAP pressure down to EPAP pressure, the machine immediately begins to ramp back up to IPAP pressure. During a period known as EEPAP (end expiratory positive airway pressure), the pressure already well on the way to peak pressure and will arrive at IPAP pressure early during inspiration. This is how Lowenstein achieves Apnea control at lower main pressures. By gently ramping back to max pressure throughout exhalation (when Apneas develop) and stenting the airway during late exhale and into the pause between exhale and inhale at zero on the flow chart. | |
| − | In contrast, the Resmed example below shows the very different implementation of | + | In contrast, the Resmed example below shows the very different implementation of a Bi-Level mode. The lower pressure of EPAP is maintained throughout exhalation, it does not provide a movement toward IPAP pressure until the beginning of inspiration. Peak IPAP pressure is not reached until mid to late inspiration. |
[[File:Resmed epr.png|thumb|center|1000px]] | [[File:Resmed epr.png|thumb|center|1000px]] | ||
| + | |||
[[File:Epr2 twin peaks.png|thumb|center|1000px]] | [[File:Epr2 twin peaks.png|thumb|center|1000px]] | ||
| − | Often when pressure is insufficient, you can see in a Resmed trace, the second hump in the flow rate and/or the fuller second half of inspiration. The example above has pressure set to 6cmH2o and with EPR of 2 (a common minimum pressure new users are sent home with). You can see the obvious instability. This is why with a Resmed machine, the moment you switch on EPR, you must increase | + | Often when pressure is insufficient, you can see in a Resmed trace, the second hump in the flow rate and/or the fuller second half of inspiration. The example above has pressure set to 6cmH2o and with EPR of 2 (a common minimum pressure new users are sent home with). You can see the obvious instability. This is why with a Resmed machine, the moment you switch on EPR, you are setting a new lower EPAP pressure. Not only that, you will spend a majority of time now at this lower EPAP pressure and during inspiration some time between the two pressures. A user will spend only a very brief time at peak IPAP pressure. You must take this into consideration. If you are looking to keep EPAP where it was, but increase pressure in inhalation then you would increase main pressures by the same amount of EPR that you use. |
| − | This same principle is not generally needed with | + | This same principle is not generally needed with SoftPap. It behaves in the reverse of Resmed EPR. You will spend a large amount of time around IPAP pressures and only briefly drop to EPAP . This does affect how each unit must be set and what disordered breathing conditions these two methods favour. You must understand how each tool works to effectively treat differing conditions. |
===Response to Events=== | ===Response to Events=== | ||
| − | Another consideration when setting either SoftPap or EPR, is how each responds during an event. Resmed machines maintain EPAP pressure during events, whereas Lowenstein maintains IPAP or EEPAP pressure. | + | Another consideration when setting either SoftPap or EPR, is how each responds during an event. Resmed machines maintain EPAP pressure during events, whereas Lowenstein maintains IPAP pressure, or when in lowensteins' Tri-level mode, EEPAP pressure (end expiratory positive airway pressure). This mode is discussed further on. |
'''Resmed EPR3''' | '''Resmed EPR3''' | ||
| Line 94: | Line 100: | ||
===Flow Limitations=== | ===Flow Limitations=== | ||
| − | + | Lowenstein softPAP 1 & 2 algorithm favors Apnea control at lower pressures on basic CPAP/APSAP models. However there are a vast range of sleep disordered breathing conditions that need specific help. If you look closely at previous example, you can see the holding of steady pressure right through inspiration, can allow inspiratory instability as in this case with '''UARS''' (upper airway respiratory syndrome). UARS sufferers may experience persistent narrowing of the airway when this mode of therapy is applied on the models more suited for generalized obstructive sleep apnea. | |
| − | + | '''Softpap3''' or '''Tri-level''' support does give some advanced level of multilevel support for a mix of OSA and UARS. This mode is introduced in the '''Prisma20a''' models and beyond. In this mode the machine addresses the problem of flow limitations by adding an extra level of inspiratory support. This mode applies an extra 1cmH2o to your machine set IPAP pressure. This raises your IPAP by 1cmH2o and applies it during early inspiration to stabilize these flow limitations. This mode has different trigger points for following your breathing pattern. | |
| − | Normally, in regular Softpap and EPR, the ramp rate is constant. Here, you can see in the example below, that the rate of Softpap3 or Tri-level mode, increases and decreases to stay in time with shorter and longer breaths. | + | Normally, in regular Softpap and EPR, the ramp rate is constant. Here, you can see in the example below, that the ramp rate of Softpap3 or Tri-level mode, increases and decreases to stay in time with shorter and longer breaths. SofPap 3 increases the maximum pressure support offered by Tri-Level mode to 4 cmH2o, but this only comes into effect @ 12cm H2o and beyond. Below is a period of flow limitation that softpap 3 is managing. |
[[File:Softpap3 flow limitation.png|thumb|center|1000px]] | [[File:Softpap3 flow limitation.png|thumb|center|1000px]] | ||
| − | + | As you can see, each of these machines must be approached very differently in use. They are tools with various modes of operation, different strengths and weaknesses. Lower level machines are factory limited to reduce the amount of useful pressure support. These entry level machines are often only useful for rudimentary control of OSA. Many people having trouble with obtaining not only apnea control but better sleep, often need these Bi-level or Tri-level modes properly applied. They really change therapy quite drastically. In quite a few instances, more levels of pressure support and finer adjustments to match an individuals breathing patterns are needed and so a step up in machine ability is required. You would be advised to quickly figure out if your machine will do what it needs to. Stop torturing yourself if you need to move to a dedicated bi-level machine. | |
| − | |||
| − | As you can see, each of these machines must be approached very differently in use. They are tools with various modes of operation, different strengths and weaknesses. Lower level machines are factory limited to reduce the amount of useful pressure support. These entry level machines are often only useful for rudimentary control of OSA. Many people | ||
===SoftPap Application in Detail=== | ===SoftPap Application in Detail=== | ||
| − | + | Available '''pressure support''' in each SoftPap level 1, 2 & 3 increases as pressure goes up. This can be confusing, and is best explained visually, with another chart. Gotta love charts. | |
| − | Remember that PrismaSmart only has access to the | + | Remember that '''PrismaSmart''' only has access to the '''levels 1 & 2''' of softpap. '''Prisma20a''' and above to '''all 3 level'''s of Softpap. |
{| class="wikitable" | {| class="wikitable" | ||
| Line 115: | Line 119: | ||
| | | | ||
| − | You can see that as pressure | + | You can see that as cpap pressure is increased, the size of each level of pressure support increases. '''8cmH2o''' and '''12cmH2o''' are key pressures when this happens. You can have a situation where your IPAP is increased by double that of your EPAP. You can also maintain constant EPAP, whilst auto apap increases your IPAP pressure like this below. |
| − | [[File:Softpap variation02.png|thumb|center| | + | [[File:Softpap variation02.png|thumb|center|800px]] |
Where this could come into play is if you are sitting just beneath one of these pressures with your Apnea well controlled but can benefit from a bump in upper pressure limits during REM. | Where this could come into play is if you are sitting just beneath one of these pressures with your Apnea well controlled but can benefit from a bump in upper pressure limits during REM. | ||
| Line 126: | Line 130: | ||
|} | |} | ||
| − | = | + | =PrismaLine Bi-Level Modes & Machines= |
| + | In tuning Bi-levels machines in particular, awareness of ventilation principles, '''pressure targeted ventilation''' (PTV) and '''volume targeted ventilation''' (VTV) are very helpful. '''PTV''' is used in cpap machines like those used for sleep apnea therapy. '''VTV''' on the other hand, is generally used for intubated critical care patients. | ||
| − | + | Each mode has a differing way of calculating and delivering air. '''VTV''' aims to hit a settable volume target, where pressure remains variable. '''PTV''' aims to hit settable pressure targets like IPAP and EPAP, whilst leaving volumes variable. | |
| − | + | The major factor affecting use of each mode, is the mask or tube seal. Volume targeted ventilation, needs a good seal to be effective, any leaks are counted towards volume delivered. Intubation ensures this seal. | |
| + | Pressure targeted ventilation, which commonly use an external mask, naturally accounts for any leaks by simply ensuring that the pressure target is reached at all times. This can be done up until the point where you hit the leak redline, limiting the machines ability to meet its pressure target. | ||
| + | |||
| + | '''PTV is the mode we are largely dealing with here.''' | ||
| + | |||
| + | With pressure targeted ventilation, obviously the correct therapy pressures must be set, but this is only the first part of the puzzle. Volume, is an important variable we must control. This is determined by the interaction of complex machine settings, user physiology and pulmonary condition. The variability of this system necessitates careful assessment of each of these three areas, to allow making informed choices when trying to achieve '''ventilation synchrony'''. This is a concept whereby machine and user are in time and satisfying the respiratory need, without fighting each other. This can cause arousal and very poor sleep quality, despite possibly having great apnea and hypopnea control. | ||
| + | |||
| + | Due to the increasing complexity of Bi-level support, and the miriad of adjustments offered by Lowenstein, a number of predetermined settings called "scopes" are provided in each bi-level mode. These presets are designed and tested to be used as a starting point for differing pulmonary conditions and co-comorbidities. | ||
| + | |||
| + | These scopes are: | ||
| + | *'''OVERLAP''' which is designed for users with obstructive sleep apnea and mild to medium COPD. | ||
| + | *'''HYPOV''' which is designed for users with nocturnal hypoventilation. | ||
| + | *'''OSAS''' which is designed for users with severe obstructive sleep apnea and a high pressure requirement. | ||
| + | |||
| + | We are going to try explore the various settings available within these "scopes", for essentially creation of your own personalized "scope". Your custom scopes can be saved and recalled from within the PrismaTS software and uploaded to a device via LAN or SD card. Of course manual adjustment of each individual setting is always possible via the machine panel. | ||
| + | ==The Settings== | ||
{| class="wikitable" | {| class="wikitable" | ||
| | | | ||
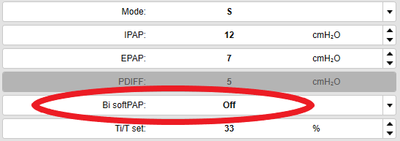
| − | + | *One of the first settings to grasp on Lowenstein Bi-level machines, is '''BisoftPAP'''. This alters pressure settings and shapes the air delivery algorithm dramatically. It is adjustable in every mode except for T. | |
| + | *The four settings are '''BiSoft0''' (Off), '''BiSoft1''', '''BiSoft2''' and '''TRILevel''' | ||
| | | | ||
| + | [[File:S mode settings.png|thumb|center|400px]] | ||
| + | |} | ||
| + | {| class="wikitable" | ||
| + | | | ||
| + | [[File:Bi SoftPAP.png|thumb|center|1000px]] | ||
| − | |- | + | *'''BiSoft modes''' apply a gradual ramp upto a pressure level known as '''EEPAP''' (end expiratory positive airway pressure). This end of expiration pressure is applied at the most critical time for airway collapse and provides important airway stenting, in preparation for inspiration. It can limit central apnea, round out exhalation and permit generally lower EPAP pressures. |
| + | |||
| + | *In using '''Tri-level''', Lowenstein recommends setup in a Bi-Level stage first, then apply Tri-Level option to use their predetermined comfort 'pressure reduction'. Lowenstein recommend return to Bi-level for further adjustment.This is due to the machine adding and subtracting pressure from IPAP and EPAP with an unseen algorithm at certain pressures, which can confuse settings. | ||
| + | *Each of the Bi-soft levels divide pressure and increased flow between exhalation and inspiration phases. This can be leveraged to target the weakness or instability in your breath shapes. | ||
| + | |} | ||
| + | Study of your flow rate graph in conjunction with mask pressure will be invaluable in fine tuning therapy settings. | ||
| + | {| class="wikitable" | ||
| + | | | ||
| + | [[File:Late collapse.png|thumb|center|300px]] | ||
| + | *'''BiSoft0''' (Off) is useful for late collapse of inspiration. This mode will delay the arrival of maximum pressure support and help fill out the second half of the inhalation. Note, this can be used to mirror Resmeds application of pressure. | ||
| + | | | ||
| + | [[File:Mid flowlimit.png|thumb|center|300px]] | ||
| + | *'''BiSoft1''' & '''BiSoft2''' is most useful for directing a large amount of pressure support at early to mid inspiration but begins to deliver some extra support to late exhalation. | ||
| + | | | ||
| + | [[File:Early collapse.png|thumb|center|300px]] | ||
| + | *'''TRILevel''' can be used to apply the greatest amount of pressure during end of expiration. This is ideal for those with collapsing exhalation and instability during time at zero and into early inspiration. | ||
| + | | | ||
| + | |} | ||
| + | {| class="wikitable" | ||
| + | | | ||
| + | [[File:Ramp IN.png|thumb|center|1000px]] | ||
| + | * '''Ramp''' Pressure rise time can be set to three levels and affects the duration of the inspiration ramp. This will move the centre point of max ipap pressure to the beginning, middle or end, of your inspiration period. Use to round out your breath shapes promoting comfort and stability. | ||
| + | |} | ||
| + | {| class="wikitable" | ||
| + | | | ||
| + | [[File:Bisoft2-ramp1.png|thumb|center|300px]] | ||
| + | *'''Ramp 1''' sets max ipap pressure to arrive early, filling out the first half of inspiration and gives the longest duration at peak pressure | ||
| | | | ||
| − | [[File: | + | [[File:Bisoft2-ramp2.png|thumb|center|300px]] |
| + | *'''Ramp 2''' sets max ipap pressure to arrive somewhere in the middle of a breath and moderate duration at at peak pressure | ||
| | | | ||
| − | + | [[File:Bisoft2-ramp3.png|thumb|center|300px]] | |
| + | *'''Ramp 3''' sets max ipap pressure to arrive later in the breath and the least length of time at peak pressure | ||
|} | |} | ||
| + | Further adjustments to the flow shape can be made. | ||
{| class="wikitable" | {| class="wikitable" | ||
| | | | ||
| − | + | [[File:Trigger in 1.png|thumb|center|300px]]| | |
| + | * '''Trigger''' An inspiratory trigger sensitivity is settable in 3 stages or can be left on Auto for the machine to determine. This tells the machine how far into a spontaneous breath it should wait to trigger further support. | ||
| | | | ||
| | | | ||
| − | + | [[File:Ti TSet.png|thumb|center|300px]] | |
| + | *'''Ti/Tset''' The relative inspiration duration can be set between 25% - 67%. This controls the threshold of peak flow for cycling to expiration. | ||
| | | | ||
| − | |||
|} | |} | ||
| + | Nearly all of these settings can be affected by one another and also the size of the minimum and maximum pressures set. If you analyze breath shapes displayed by Oscar and use the tools available to shape these breaths and bring your volumes into comfortable ranges, you should be well on your way to mastering this element of your therapy. | ||
| + | ===S=== | ||
| − | === | + | ===T=== |
| − | === | + | ===S/T=== |
| − | === | + | ===Auto S=== |
| − | ===Auto S=== | + | ===Auto S/T=== |
==Anticyclic Servoventilation== | ==Anticyclic Servoventilation== | ||
Latest revision as of 08:42, 17 April 2024
|
Afrikaans /
في الصفحة /
български /
中国 /
臺灣 /
čeština/
Dansk /
Deutsch /
Ελληνικά /
Español /
Filipino /
Français /
עברית /
Magyar /
Italiano /
日本語 /
한국어 /
Nederlands /
Norsk /
Polskie /
Português /
Română /
Pусский /
Suomalainen /
Svenska /
ภาษาไทย /
Türkçe |
Contents
Oscar Optimisation for Lowenstein
Prisma Smart & Prisma 20A Devices
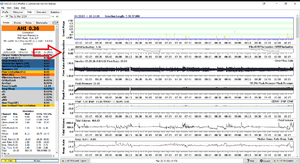
Lowenstein PrismaLine machines produce a lot of overlays and event flags. If left in default view, this excessive data will overwhelm your OSCAR display. It will make it impossible for forum members and medical professionals, to quickly understand how you are responding to your machine and its settings. Here are a few tips to help clean up that display and make the detailed data your machine is producing, a lot more meaningful.
If you are starting with a fresh Oscar install make sure to optimize first according to apneaboard recommendations here:
https://www.apneaboard.com/wiki/index.php?title=OSCAR_Chart_Organization
|
Event Types
| |
|
Flow Limitation Flag Color
| |
|
Adjust y-axis scaling
|
Finally, be sure to resize all graphs either through preferences, or by manually dragging them to fit more of the important ones in a single screen clip.
Advanced users
Advanced users may set Y-Axis over-ride on many of the other charts as well. This increases user friendliness and read-ability. Otherwise, outlier data can re-scale the chart, causing irregular display of the main data and confusing day to day comparisons. The increments of Y-Axis may also end up in strange divisions. On the included examples, most of the Y-Axis have been overridden to give a repeatable and consistent view of each metric. Y-axis overrides that increase usefulness are, leak rate 0-50 with dotted line at leak threshold and tidal volume 0-1000. Mask Pressure & Pressure can benefit from overide by setting to a tighter range around your own specific pressures. Try make all Y-Axis increments equal whole numbers. A dotted line at max mask pressure can be handy if using APAP.
Finally, but maybe most helpful for interpreting your data, is to create at least 2 profiles. The first one I call 'compact' and the other 'detailed'. In the compact profile, shrink the height of as many data rows as possible. Size the flowrate graph so the spike ups are not too prominent, but the biggest are still easily seen. This will give you a good general picture of a nights therapy. Most full charts pictured in this wiki are using this compact view.
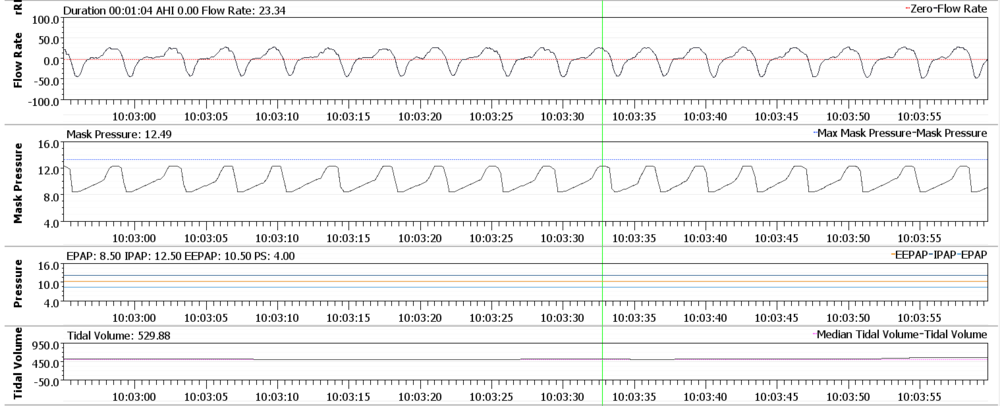
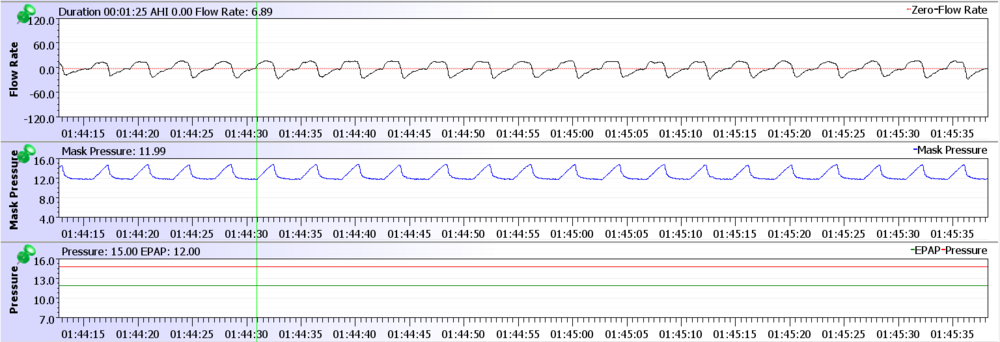
However, this compact view will not be best for analyzing breath shapes and fine tuning therapy settings. This is especially true as soon as you start using bi-level or any variant of it, like softpap or epr etc. For this you will want a profile you can switch too quickly with a couple of critical changes to at least Flow Rate and Mask Pressure. In order to set these for best viewing, you should make sure the y-axis override is not too far off the actual flow rate and your pressure range. Make sure your oscar window is maximized or a least how you usually view it. Pick the best section of one of your best nights. Zoom in with left click until the flowrate duration is 1 minute. From here, drag the row height so that each inhalation is close to semi circle, without being too tall or too squat. Roughly match the mask pressure signal to the same height as each breath signal, so they are relative to each other.
Note: Consistent viewing will be dependent on your window size and flowrate duration being the same as they are when you set this.Without a set baseline and zoom like this, you will not get as good a sense of each day compared to one another. Breaths can appear far taller or flatter, all dependent on these variables. If you are wanting to see subtle change in breath dynamics with a change in pressure support for eg. then this is very helpful.
Extra Settings for Prisma Bi-Level Devices
Apart from the above display settings, Lowenstein Bi-level devices can need some extra tweaking.
|
Display Deep-Sleep
| |
|
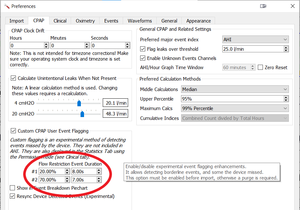
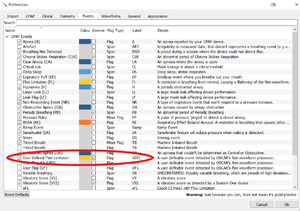
User Defined Flow Limitations
NOTE If the custom flags are not showing after restarting Oscar, you will have to use the 'rebuild cpap data' menu option. |
PrismaLine CPAP & APAP modes
SoftPAP Compared EPR
There is quite a difference in the so called "comfort" settings of the various CPAP & APAP machines. Lowenstein Prisma Smart & Prisma20A provide these settings as a limited form of regular Bi-level modes found on bi-level machines. These bi-level modes allow a more sophisticated pressure range for addressing more complicated respiration needs.
Lowenstein SoftPap is here compared in application to the EPR of Resmed.
Algorithm differences
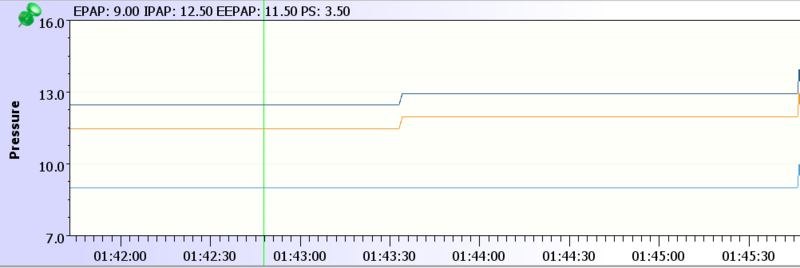
Bi-level is the application of more than 1 pressure level during different breathing stages. The example below shows bi-level therapy in action. This is infact not on a "Bi-level" machine, but a Prisma20A with CPAP pressure of 12cmH2o and Softpap2 activated. The machine is now applying 2 different pressures. The lower pressure of EPAP (exhalation positive airway pressure) and the higher pressure of IPAP (inhalation positive airway pressure). The difference between these two pressures is termed pressure support, abreviated normally to PS. The example below shows a PS of 3cmH2o. This is the maximum PS available on a Prisma Smart and delivers the same support as Resmeds EPR 3, although as you will see, the differing air delivery of the two devices, affects how this pressure support shapes your breathing.
If we look closely at the bi-level algorithm in use by Lowenstein, we notice that following the release of IPAP pressure down to EPAP pressure, the machine immediately begins to ramp back up to IPAP pressure. During a period known as EEPAP (end expiratory positive airway pressure), the pressure already well on the way to peak pressure and will arrive at IPAP pressure early during inspiration. This is how Lowenstein achieves Apnea control at lower main pressures. By gently ramping back to max pressure throughout exhalation (when Apneas develop) and stenting the airway during late exhale and into the pause between exhale and inhale at zero on the flow chart.
In contrast, the Resmed example below shows the very different implementation of a Bi-Level mode. The lower pressure of EPAP is maintained throughout exhalation, it does not provide a movement toward IPAP pressure until the beginning of inspiration. Peak IPAP pressure is not reached until mid to late inspiration.
Often when pressure is insufficient, you can see in a Resmed trace, the second hump in the flow rate and/or the fuller second half of inspiration. The example above has pressure set to 6cmH2o and with EPR of 2 (a common minimum pressure new users are sent home with). You can see the obvious instability. This is why with a Resmed machine, the moment you switch on EPR, you are setting a new lower EPAP pressure. Not only that, you will spend a majority of time now at this lower EPAP pressure and during inspiration some time between the two pressures. A user will spend only a very brief time at peak IPAP pressure. You must take this into consideration. If you are looking to keep EPAP where it was, but increase pressure in inhalation then you would increase main pressures by the same amount of EPR that you use.
This same principle is not generally needed with SoftPap. It behaves in the reverse of Resmed EPR. You will spend a large amount of time around IPAP pressures and only briefly drop to EPAP . This does affect how each unit must be set and what disordered breathing conditions these two methods favour. You must understand how each tool works to effectively treat differing conditions.
Response to Events
Another consideration when setting either SoftPap or EPR, is how each responds during an event. Resmed machines maintain EPAP pressure during events, whereas Lowenstein maintains IPAP pressure, or when in lowensteins' Tri-level mode, EEPAP pressure (end expiratory positive airway pressure). This mode is discussed further on.
Resmed EPR3
Lowenstein SoftPap2
Flow Limitations
Lowenstein softPAP 1 & 2 algorithm favors Apnea control at lower pressures on basic CPAP/APSAP models. However there are a vast range of sleep disordered breathing conditions that need specific help. If you look closely at previous example, you can see the holding of steady pressure right through inspiration, can allow inspiratory instability as in this case with UARS (upper airway respiratory syndrome). UARS sufferers may experience persistent narrowing of the airway when this mode of therapy is applied on the models more suited for generalized obstructive sleep apnea.
Softpap3 or Tri-level support does give some advanced level of multilevel support for a mix of OSA and UARS. This mode is introduced in the Prisma20a models and beyond. In this mode the machine addresses the problem of flow limitations by adding an extra level of inspiratory support. This mode applies an extra 1cmH2o to your machine set IPAP pressure. This raises your IPAP by 1cmH2o and applies it during early inspiration to stabilize these flow limitations. This mode has different trigger points for following your breathing pattern.
Normally, in regular Softpap and EPR, the ramp rate is constant. Here, you can see in the example below, that the ramp rate of Softpap3 or Tri-level mode, increases and decreases to stay in time with shorter and longer breaths. SofPap 3 increases the maximum pressure support offered by Tri-Level mode to 4 cmH2o, but this only comes into effect @ 12cm H2o and beyond. Below is a period of flow limitation that softpap 3 is managing.
As you can see, each of these machines must be approached very differently in use. They are tools with various modes of operation, different strengths and weaknesses. Lower level machines are factory limited to reduce the amount of useful pressure support. These entry level machines are often only useful for rudimentary control of OSA. Many people having trouble with obtaining not only apnea control but better sleep, often need these Bi-level or Tri-level modes properly applied. They really change therapy quite drastically. In quite a few instances, more levels of pressure support and finer adjustments to match an individuals breathing patterns are needed and so a step up in machine ability is required. You would be advised to quickly figure out if your machine will do what it needs to. Stop torturing yourself if you need to move to a dedicated bi-level machine.
SoftPap Application in Detail
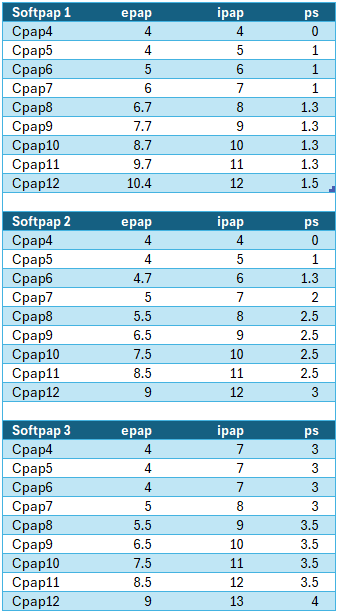
Available pressure support in each SoftPap level 1, 2 & 3 increases as pressure goes up. This can be confusing, and is best explained visually, with another chart. Gotta love charts. Remember that PrismaSmart only has access to the levels 1 & 2 of softpap. Prisma20a and above to all 3 levels of Softpap.
|
You can see that as cpap pressure is increased, the size of each level of pressure support increases. 8cmH2o and 12cmH2o are key pressures when this happens. You can have a situation where your IPAP is increased by double that of your EPAP. You can also maintain constant EPAP, whilst auto apap increases your IPAP pressure like this below. Where this could come into play is if you are sitting just beneath one of these pressures with your Apnea well controlled but can benefit from a bump in upper pressure limits during REM. If a user is shy of high pressure, or suffers aerophasia around one of these pressures, this smaller step in EPAP can help. You could, as above image shows, set APAP with a range of 11.5cm to 12cm & softPap 3. During REM or a positional change etc, the extra support kicks in on any flow limitations that develop with virtually no detectable EPAP increase. The Prisma20a can hold this extra pressure for just the right length of time during a rough patch, before letting you back down. This may only put you into aerophasia territory for a very limited time the whole night and minimizes disturbances from moving pressures. Also of note, is what happens at low pressures using SoftPap. On SoftPap 3 the first few pressures are identical. I wonder how many beginners and doctors think they are gradually increasing their pressure over a period, when they are actually not changing anything but a number on the LCD display. |
PrismaLine Bi-Level Modes & Machines
In tuning Bi-levels machines in particular, awareness of ventilation principles, pressure targeted ventilation (PTV) and volume targeted ventilation (VTV) are very helpful. PTV is used in cpap machines like those used for sleep apnea therapy. VTV on the other hand, is generally used for intubated critical care patients.
Each mode has a differing way of calculating and delivering air. VTV aims to hit a settable volume target, where pressure remains variable. PTV aims to hit settable pressure targets like IPAP and EPAP, whilst leaving volumes variable.
The major factor affecting use of each mode, is the mask or tube seal. Volume targeted ventilation, needs a good seal to be effective, any leaks are counted towards volume delivered. Intubation ensures this seal. Pressure targeted ventilation, which commonly use an external mask, naturally accounts for any leaks by simply ensuring that the pressure target is reached at all times. This can be done up until the point where you hit the leak redline, limiting the machines ability to meet its pressure target.
PTV is the mode we are largely dealing with here.
With pressure targeted ventilation, obviously the correct therapy pressures must be set, but this is only the first part of the puzzle. Volume, is an important variable we must control. This is determined by the interaction of complex machine settings, user physiology and pulmonary condition. The variability of this system necessitates careful assessment of each of these three areas, to allow making informed choices when trying to achieve ventilation synchrony. This is a concept whereby machine and user are in time and satisfying the respiratory need, without fighting each other. This can cause arousal and very poor sleep quality, despite possibly having great apnea and hypopnea control.
Due to the increasing complexity of Bi-level support, and the miriad of adjustments offered by Lowenstein, a number of predetermined settings called "scopes" are provided in each bi-level mode. These presets are designed and tested to be used as a starting point for differing pulmonary conditions and co-comorbidities.
These scopes are:
- OVERLAP which is designed for users with obstructive sleep apnea and mild to medium COPD.
- HYPOV which is designed for users with nocturnal hypoventilation.
- OSAS which is designed for users with severe obstructive sleep apnea and a high pressure requirement.
We are going to try explore the various settings available within these "scopes", for essentially creation of your own personalized "scope". Your custom scopes can be saved and recalled from within the PrismaTS software and uploaded to a device via LAN or SD card. Of course manual adjustment of each individual setting is always possible via the machine panel.
The Settings
|
|
Study of your flow rate graph in conjunction with mask pressure will be invaluable in fine tuning therapy settings.
|
|
|
|
|
|
|
Further adjustments to the flow shape can be made.
|
|
|
Nearly all of these settings can be affected by one another and also the size of the minimum and maximum pressures set. If you analyze breath shapes displayed by Oscar and use the tools available to shape these breaths and bring your volumes into comfortable ranges, you should be well on your way to mastering this element of your therapy.
S
T
S/T
Auto S
Auto S/T
Anticyclic Servoventilation
The PrismaCR models of Lowensteins PrismaLine range offer an ASV mode for treatment of central and mixed apnea.

Donate to Apnea Board
